Ra-Hoor-Khuit Network's
Magickal Library
Yoga

Kripalu
-------*-------
Yoga
Posture
-------*-------
Sheets

TABLE OF CONTENTS
*Introduction
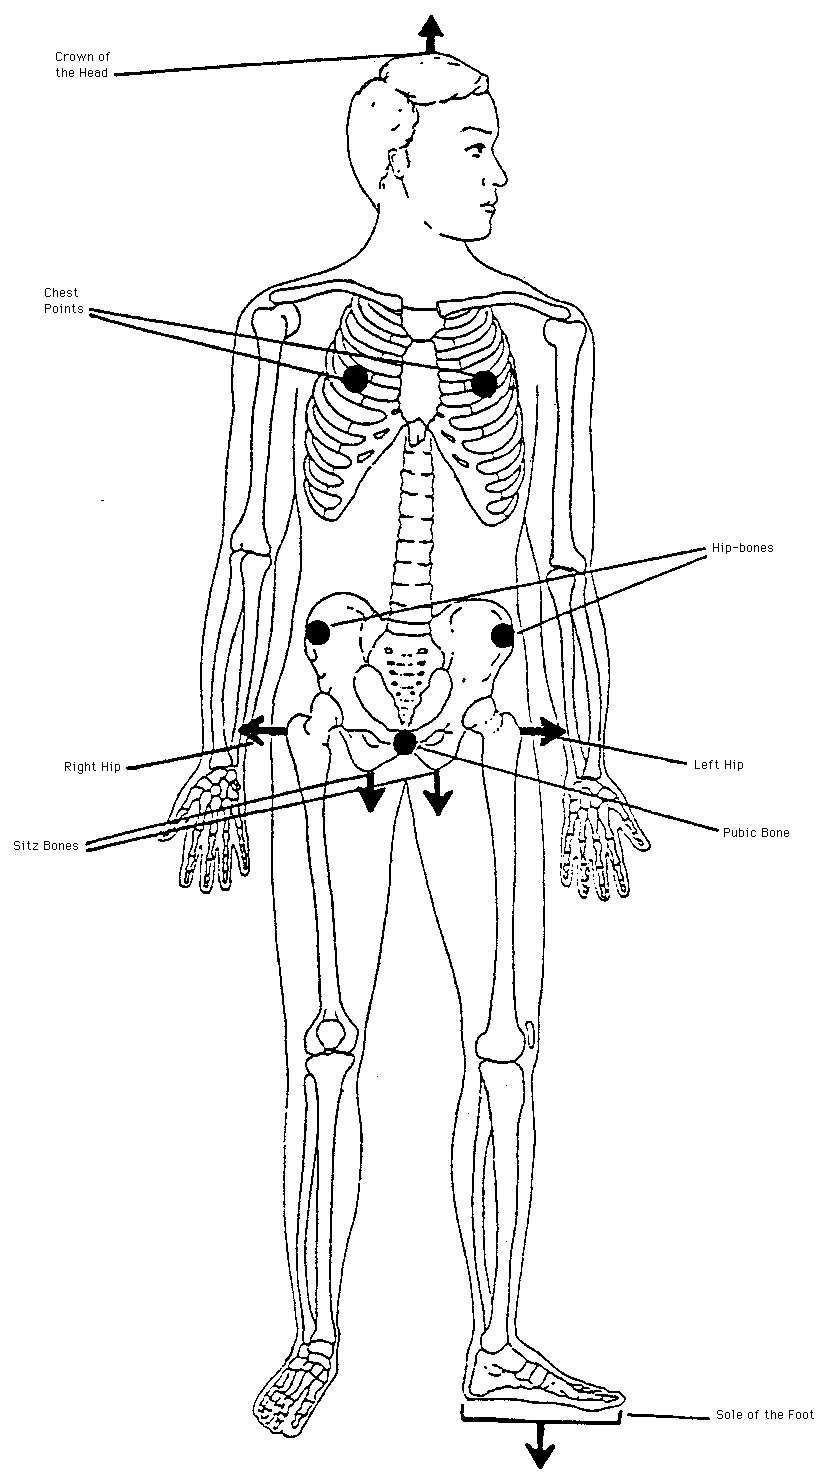
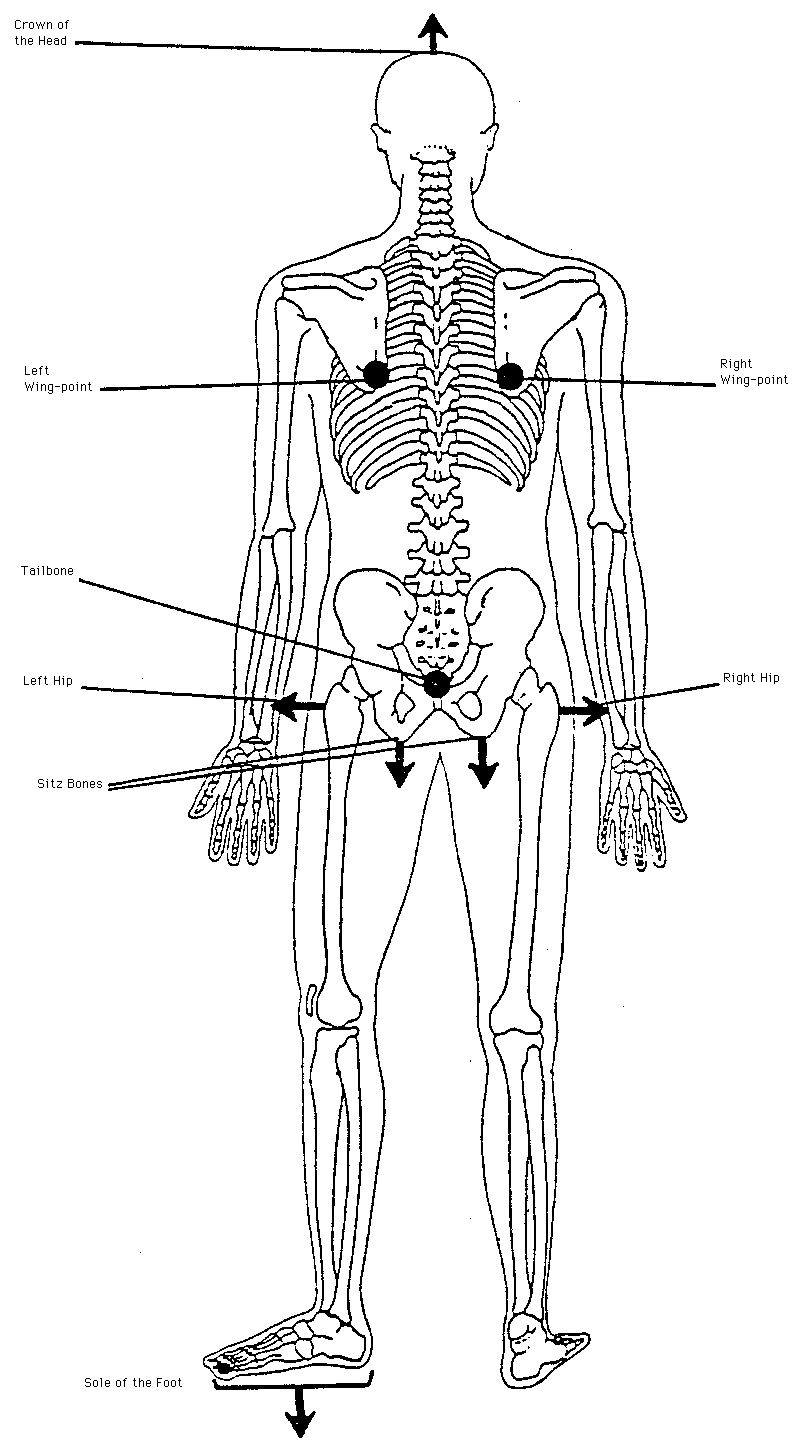
*Diagrams of Kripalu Yoga Press Points
*Press Point Definitions
KRIPALU YOGA POSTURE SHEETS
(English/Sanskrit Names of Postures)
-
Abdominal Massage/Bhunaman Vajrasana
-
Boat/Navasana
-
Bow/Dhanurasana
-
Bridge/Setu Bandhasana
-
Camel/Ushtrasana
-
Child/Garbhasana
-
Chin to Knee/Janu Shirshasana II
-
Cobra/Bhujangasana
-
Dancer/Natrajasana
-
Downward Dog/Adho Mukha Shvanasana
-
Eagle/Garudasana
-
Fish/Matsyasana
-
Frog/Mandukasana
-
Half Circle/Ardha Mandalasana
-
Half Locust/Ardha Shalabhasana
-
Half Moon/Ardha Chandrasana
-
Half Shoulderstand/Ardha Sarvangasana
-
Head to Knee/Janu Shirshasana I
-
Hero/Virasana
-
Inclined Plane/Purvottanasana
-
Knee-Down Twist/Supta Matsyendrasana
-
Locust/Shalabhasana
-
Moon Salutation/Chandra Namaskar
-
Mountain/Tadasana
-
Pigeon I & Il/Kapotasana I & II
-
Posterior Stretch/Pashchimottanasana
WELCOME TO KRIPALU YOGA!!
How is Kripalu Yoga different from other forms of yoga?
Kripalu Yoga is a yoga of consciousness. Immersing yourself consciously in your experience of Kripalu Yoga provides the means for self-discovery. So enter into the physical Postures not to work at perfecting them mechanically but to allow the postures to reveal to you who you are.
Begin with listening to and following the wisdom of your body and then focusing the mind in a double-arrowed awareness: outward on the posture itself and inward on your internal state that is colored moment to moment by shifting sensations, emotions, and thoughts.
Focusing the mind with non-judgemental awareness allows you to be in touch with the true Self of stillness that embraces every experience, letting life flow without resisting any of it.
What is Kripalu Yoga's "Press Point" methodology?
Kripalu Yoga's "press point" method for moving into the postures aids attuning to your body. Because the press points are simple, the mind can relax and let go of any need to have the posture "picture perfect."
At the same time the press points assure proper physical alignment, allowing for maximum stretch in the safest and most supported way. The effortless alignment that is instantly created allows your body to go to its natural limit in a relaxed way, without forcing.
How can I practice Kripalu Yoga using the press points?
These posture sheets have been developed as a tool for utilizing
Kripalu Yoga press points to get the most out of your experience of
Kripalu Yoga. They are meant to serve as a reminder of your
experience of being guided into the postures in your yoga program.
Before moving into a posture, sit quietly for a moment, breathing evenly. Read through the instructions for the asana, making certain that you understand each press point and its direction. Visualize yourself moving into the posture with an awareness of each point. Again sit quietly, relaxing the body. Then come into the starting position for the posture and begin to allow your body to move into it, focusing your awareness on each press point in turn.
When you feel that you are in the asana, once again place your awareness on the press points, pressing into each in turn while keeping your breathing steady and focusing on sensations. Allow micromovements to emerge. Remember that Kripalu Yoga postures are alive, not static. They breathe just as you breathe.
Bring your awareness inward as you hold the posture, witnessing whatever sensations, emotions, or thoughts arise. Stay relaxed in the holding, breathing evenly. As you feel the deliciousness of the full stretch and the energy release that that brings, allow your body to release the holding and flow into a complementary movement.
How does the practice of Kripalu Yoga relate to my life as a whole?
There are certainly physical and emotional benefits of consistent practice of Kripalu Yoga but they are incidental to the awareness that it fosters. So use your yoga practice as a time of formal training in consciousness, knowing that your perseverence and dedication will result in the state of witness consciousness remaining with you during your day in whatever situations arise.
It is our heart's wish that these sheets aid you in experiencing on every level the joy and richness of the Self you are as you continue your practice of Kripalu Yoga.
Jai Bhagwan.
The Kripalu Yoga Teachers
KRIPALU YOGA PRESS POINTS
PRESS POINT DEFINITIONS
CHEST POINTS:
The two points in the soft muscle tissue of the chest approximately two inches below the "clavicles" (collar bones). One way of finding these points 's to extend your arms out to the side at shoulder height with palms facing downward. Keeping your arms at shoulder height, bend your elbows, bringing your thumbs toward your chest along a parallel plane to the ground. The chest points are where the thumbs touch the chest. This may vary slightly with each individual, in general, they are in line with the ear lobes.
Pressing into the chest points helps lift the chest, allowing the lungs to expand arid fill more fully with breath. The chest points also help keep the spine erect, the torso straight, and the shoulder blades in their proper place.
CROWN OF THE HEAD:
The top center of the skull. The "fontanelle." When the crown of the head is pressed upward away from the shoulders, the entire spine lengthens. The back of the neck elongates while the chin remains parallel to the ground.
HIP BONES: (As in pressing your hip bones into the ground in the Bow posture.)
These are the front-facing points of the "ilium" or the pelvic bowl.
Pressing into these points helps keep the gluteous folds firm which
in turn supports the tower spine during backward bending postures.
HIPS: (As in pressing your hip out to the side in the Half Moon posture.)
These are the points on the side of the torso just below the waist, technically located in the soft muscle tissue above the "head of the femur" and just below the hip bone.
Pressing into these points produces a side stretch in the opposite direction and helps balance the work being done in the muscle groups on the opposite side. For example, in the Half Moon posture, pressing into the right hip allows the torso to bend to the left side.
<>PRESS POINTS:
Grounding points. The obvious, structural points which are the foundation of the posture and establish its form. The mind focuses on the direction of the press and the body moves in response to the pressing.
Some press points assist in creating alignment. They must be pressed in order for the posture to happen. They elongate as welL.as trigger the unfolding of the body's natural flexibility. When the mind is absorbed in the press points, the body is freed to express that natural flexibIlity.
Other, more subtle press points counterbalance tightness in specific areas. Because of the muscular structure of his or her particular body, a student may feel at the peak of alignment in a posture, but actually be out of balance or alignment visually and anatomically. These less obvious points reestablish true alignment by inviting the tight muscles to relax and lengthen. They give the posture the next level of refinement and body awareness.
SITZ BONES:
The two bones in the buttocks that we sit on. Technically called the "ischial tuberosities." Used primarily in seated postures where the sitz bones are pressed down into the ground to assist in elongating the spine.
SOLES OF THE FEET:
The bottom of the feet. Pressing the whole sole down equally, both the ball of the foot and the heel, so that there is a sense of center and balance. Pressing the soles of your feet into the ground is achieved by consciously focusing your awareness there. Imagine that you could press your feet down into the earth without bending your knees, as if sinking into mud or sand. Or imagine that you are wearing heavy, weighted boots. It may take some practice to get the feel of it, but there is a definite sense of increased pressure against the earth and a feeling of groundedness when practiced correctly. Pressing into the feet provides grounding, stability, and balance for all standing and balancing postures. It allows the whole body to extend and gives the energy a direction.
THE SQUEEZE:
The rotating inward and lifting upward of the muscles of the gluteus folds, where the buttocks muscles meet the upper thighs. The upper buttocks remain slightly softer, getting firmer as the muscles come closer to the fold. The fronts of the thighs rotate slightly outward as the entire pelvis comes naturally into alignment. The arches of the feet as well as the kneecaps are automatically lifted and the backs of the thighs lengthen.
Among its functions, the squeeze is the origin of movement in the belly-down postures. it can also be engaged as a regulator to protect the lower back area and relieve discomfort during backward bending postures.
TAILBONE:
Technically called the "coccyx." it's like a bony tail on the end of the "sacrum" at the base of the spine. Lifting the tailbone acts like a lever that titts the torso forward with the spine elongated so that the bending comes from the hips and pelvis rather than the lower back. When practiced correctly, this shifts the focus of the stretch to the backs of the legs which is desirable.
WING POINTS:
The points on the lower inside edges (closest to the spine) of the "scapulas" or shoulder blades. The wing points are used most often in the rotation of the spine, as in the spinal twist. If you press one of the wing points, the torso will rotate in that direction.
--------------------------------------------------------------------------------
ABDOMINAL MASSAGE
____________________
Bhunaman Vajrasana
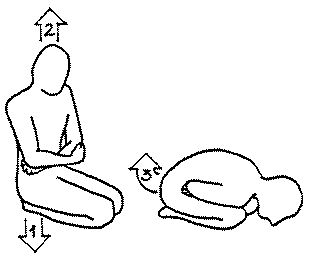
1. Sitting on your heels, press your sitz bones downward and allow the pressing to lengthen your spine.
2. Press the crown of your head away from your shoulders.
Bring your left fist to the lower right side of your abdomen and fold your right elbow over your fist.
3. Gently lift your tailbone and allow the lifting to extend your torso over your knees. Relax your belly and allow gentle micromovements to massage the right side of your abdomen.
Allow your torso to return to an upright position. Gently press your fingertips into the upper right side of your abdomen and work them across to the left and down.
Bring your right fist to the lower left side of your abdomen and fold your left elbow over your fist. Repeat step 3 on the left side.
Allow your torso to return to an upright position.
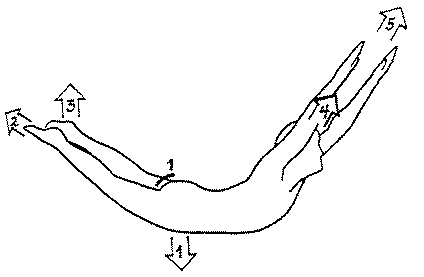
BOAT (Crossing over the water of change)
____________________
Navasana
Lie on your belly and extend your arms out in front of you, palms facing each other, with either your forehead or your chin resting on the ground. (For an easier variation, start with your arms at your sides.)
1. Bring up the squeeze, pressing your pubic bone downward, and allow the pressing to lift your torso, hands and feet.
2. Press the tips of your toes away from your hips.
3. Press your heels upward.
4. Press the crown of your head away from your shoulders and feel the elongation in the back of your neck.
5. Press out through your fingertips.
Variation: Open your arms out to the sides and allow them to float back behind your back. Interlace your fingers, press your hands away from your body, and allow your chest to open.
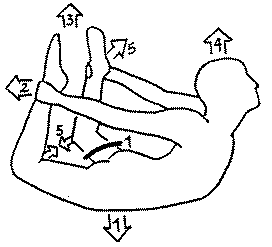
BOW
____________________
Dhanurasana
Lie on your belly with your chin resting on the ground. Bend your knees and allow your feet to come close to your butticks. Reach back and hold your ankles.
1. Bring up the squeeze, pressing your pubic bone downward.
2. Press your feet back into your hands, allowing your chest to rise with the pressing.
3. Press the tips of your toes upward.
Special Note: To avoid strain to a sensitive lower back, keep your knees on the ground. The squeeze and the pressing downward of the pubic bone will engage your lower back muscles to protect this area.
4. To relieve knee strain, press your heels upward and press the insides of your knees toward each other.
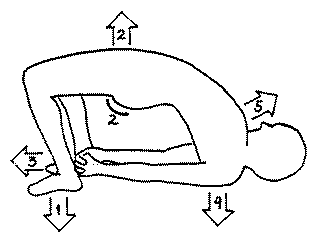
BRIDGE
____________________
Setu Bandhasana
Lie on your back with your arms at your sides, palms facing downward. Bend your knees, bringing the soles of your feet close to your buttocks.
1. Press the soles of your feet downward.
2. Bring up the squeeze and press your pubic bone upward. Allow the pressing to lift your hips.
Feel your weight shifting to your shoulders.
3. Interlace your fingers and press your hands toward your feet, walking your shoulder blades closer together. Allow your chest to open.
4. Press downward through the tops of your shoulders.
5. Expand your chest by pressing out through your chest points.
To come out of the posture, release your hands and allow your spine to roll down, using the squeeze to control your descent.
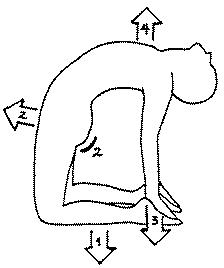
CAMEL
____________________
Ushtrasana
Ushtrasana I: Beginning from a kneeling position sitting on your heels, place the palms of your hands on the ground behind you, and allow your weight to fall onto your hands.
Ushtrasana II: Begin from a kneeling position with buttocks raised off your heels and your knees directly under your hips.
1. Press your shins into the floor.
2. Bring up the squeeze and press your pubic bone forward, away from your heels.
3. Place your palms on your heels one at a time. (If unable to reach your heels you may raise them by flexing your toes under or place one or more cushions on your heels and rest your palms on the cushions.) Press down through the palms of your hands.
4. Expand your chest by pressing out through your chest points.
5. Either tuck your chin toward your chest, or lift your chin and allow your neck to relax, following the curve of your spine.
To release the posture, press the crown of your head away from your shoulders and lower your sitz bones to your heels, allowing your torso to follow. Or you may prefer to release the posture by tossing one hand forward over your head, allowing your torso to follow.
Special Awarenesses: To avoid neck strain, do not lift head from full camel position. First release the posture, then allow neck to relax and head to return to upright position.
To relieve pressure on knees and/or feet, place a folded blanket or towel under the stressed area.
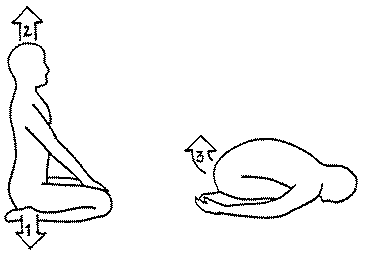
CHILD
____________________
Garbhasana
1. Sitting on your heels, press your sitz bones downward.
2. Press the crown of your head away from your shoulders.
3. Lift your tailbone and allow your torso to come forward with your forehead resting on the floor and your arms at your sides.
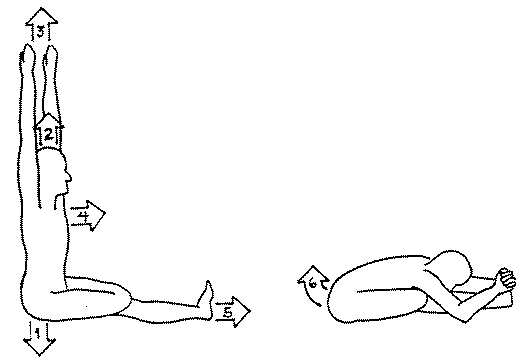
CHIN TO KNEE
____________________
Janu Shirshasana
From a sitting position with your legs extended, bend one knee and cross it over the knee of the extended leg, placing your foot near the outside of your hip.
1. Press your sitz bones downward.
2. Press the crown of your head away from your shoulders.
3. Allow your fingertips to float up overhead and press them away from your shoulders.
4. Expand your chest by pressing out through your chest points.
5. Press the heel of your extended leg away from your hip.
6. Lift your tailbone and allow the lifting to extend your torso out over your extended leg.
Release, allowing your torso to return to an upright position, and repeat on the opposite side.
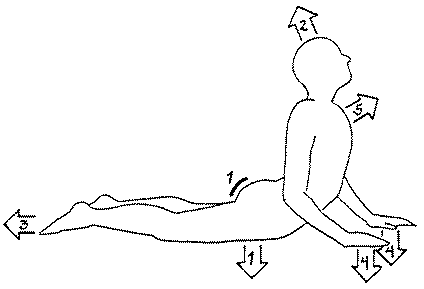
COBRA
____________________
Bhujangasana
From a belly-down position, place your hands palms down beneath your shoulders with your elbows close to your sides.
1. Bring up the squeeze and press your pubic bone and feet downward, allowing your upper body to lift in response to the pressing. Do not apply any pressure to the palms of your hands.
2. Press the crown of your head away from your shoulders.
3. Press the tips of your toes away from your hips.
4. When you feel established in the posture, press your palms downward just enough to feel the stretch.
5. If you've entered into the full cobra position, expand your chest by pressing out through your chest points.
Release the pressure on your palms and gradually release the squeeze as your body returns to the starting position.
DANCER
____________________
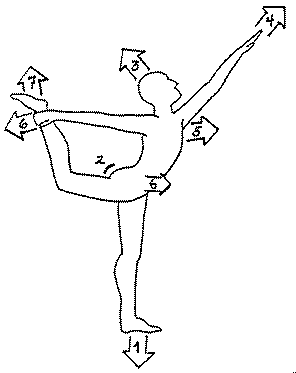
Natrajasana
Standing with your feet parallel and hip width apart, shift your weight toward the balls of your feet and press the soles of your feet downward.
Shift your weight to your right foot, lifting the left foot off the ground, and bringing your hara over the supporting foot. Focus your gaze on a point at eye level.
Reach your left hand behind you and hold your left ankle.
1. Press the sole of your supporting foot downward.
2. Bring up the squeeze.
3. Press the crown of your head away from your shoulders and feel the elongation of your spine.
4. Allow the fingertips of your right hand to rise up overhead and press them upward away from your shoulder.
5. Expand your chest by pressing out through your chest points.
6. Press your left foot back against your hand as you press your left hipbone slightly forward, making hips parallel and facing forward.
7. Press the sole of your left foot upward and allow the pressing to extend your torso forward.
Release the posture and repeat on the opposite side.
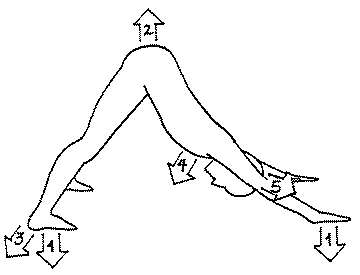
DOWNWARD DOG
____________________
Adho Mukha Shvanasana
From the table position, curl your toes under. (Variation: From standing forward bend, walk your hands about one leg length away from your feet.) Spread your fingers wide apart.
1. Press the palms of your hands and the soles of your feet downward, allowing your hips to rise upward.
2. Press your tailbone upward and feel your spine elongating.
3. Press your heels downward and feel the backs of your legs lengthening even more.
4. Expand your chest by pressing out through your chest points.
5. Press the crown of your head away from your shoulders.
To release, bend your knees and return to the starting position.
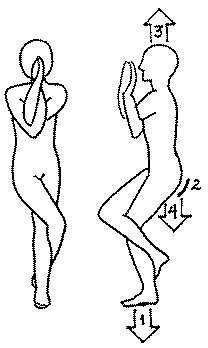
EAGLE
____________________
Garudasana
Standing with your feet parallel and hip width apart, shift your weight toward the balls of your feet and press the soles of your feet downward.
Cross your arms at the elbows and intertwine them, allowing your palms to face each other.
Shift your weight to one foot, lifting the other foot off the ground and bringing your hara over the supporting foot. Focus your gaze at a point at eye level.
Intertwine your legs, crossing them at the knees.
1. Press the sole of your supporting foor downward.
2. Bring up the squeeze.
3. Press the crown of your head away from your shoulders and feel the elongation of your spine.
4. Soften your knees as you press your sitz bones toward your heels.
Release your arms and legs and return to the starting position. Repeat on the opposite side.
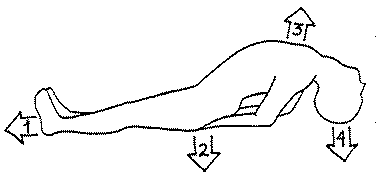
FISH
____________________
Matsyasana
Lie on your back with your legs straight and your feet together. Extend your arms underneath your body with your hands resting palms down and your elbows as close together as possible. (Once you have become comfortable with this starting position, you may choose to enter the posture with your arms at your sides rather than under your body.)
1. Press your heels away from your hips.
2. Tilt your pelvis forward and press your sitz bones and tailbone downward, allowing the pressing to lift your torso and open your chest.
3. Press out through your chest points.
4. Press the crown of your head downward.
As you feel stable in the posture you may release your arms and bring your hands to prayer position over your heart or to the floor overhead, or allow them to move in pranic response. (Caution: To prevent neck strain, press your sitz bones firmly downward and proceed slowly and carefully.)
To release, press your sitz bones firmly downward, bringing your weight onto your elbows, and gently slide your head back down.
FROG
____________________
Mandukasana
From a table position, slide your knees and feet wide apart. (Turn your feet outward and bring your feet in line with your knees for a more advanced stretch.) Interlace your fingers or place your palms down and bring your forearms to the ground, forming a triangle of support.
1. Press your forearms downward to support your weight.
2. Allow your pubic bone to become heavy, pressing downward.
3. Press the crown of your head away from your shoulders and feel the lengthening of your spine.
4. Press your tailbone back toward your heels.
Allow micro movements to open your hips. (Rock your hips forward and back. Circle your pelvis. Lift and lower your tailbone.)
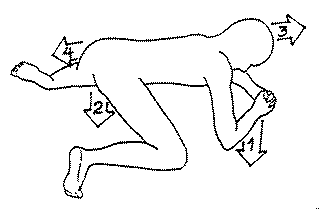
HALF CIRCLE
____________________
Ardha Mandalasana
From a seated position, bend your knees and place the soles of your feet on the floor close to your buttocks about hip width apart. Lower your knees to the left, allowing your feet to adjust to this position. (You may also enter this posture from a seated position with your right leg extended and the sole of your left foot touching the inner thigh, as in the Head to Knee posture.)
1. Sweep your right hand overhead and to the left, shifting your weight toward your left hand as you press your left shin downward, allowing the pressing to lift your buttocks.
2. Press the palm of your left hand downward.
3. Press the tips of the toes of your extended foot away from your hip, allowing your right leg to extend and adjust to the new position.
4. Bring up the squeeze and press your pubic bone forward.
5. Press the crown of your head away from your shoulders.
6. Expand your chest by pressing out through your chest points.
7. Press your upper fingertips away from your shoulder.
Release the posture and repeat on the opposite side.
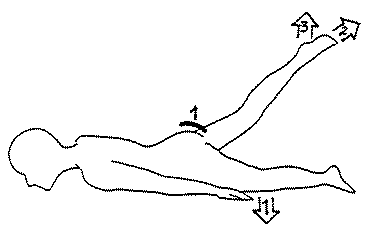
HALF LOCUST
____________________
Ardha Shalabhasana
Lie on your belly with your chin resting on the ground and your arms extended, palms down, either under your thighs or by your sides.
1. Bring up the squeeze, pressing one leg downward, and allow the pressing to raise your other leg.
2. Press the tips of the toes of your raised foot away from your hip and feel your leg elongating.
3. Press the top of the heel of the raised foot upward without sacrificing the elongation of that leg.
Release the posture and repeat on the opposite side.
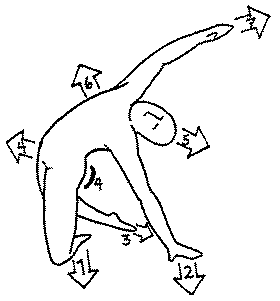
HALF MOON
____________________
Ardha Chandrasana
1. Standing with your feet parallel and hip width apart, shift your weight toward the balls of your feet and press the soles of your feet downward.
2. Bring up the squeeze.
3. Press the crown of your head away from your shoulders.
4. Allow your fingertips to rise overhead, interlacing your fingers with your index fingers extended, and press your fingertips away from your shoulders.
5. Press your right foor downward as you press your right hip out to the side. Allow the pressing to extend your torso and arms to the left.
6. Press your inside hipbone and chest point slightly forward as you press your opposite upper wing point back, to rotate your torso into a true side stretch, leaning neither forward nor back.
To release the posture, press the sole of your inside foot downward and allow your body to return to the starting position.
Repeat the posture on the opposite side.

HALF SHOULDERSTAND (Mother of All Postures)
____________________
Ardha Sarvangasana
Lying on your back, bend your knees and swing your legs up overhead, bringing your hands up to support your lower back and hips.
Variation: Enter the posture from the bridge pose by bringing your palms up to support your hips and lifting your legs one at a time, keeping your knees relaxed.
1. Press your shoulders downward.
2. Press your feet away from your hips.
To release the posture, bring your knees toward your chest and either allow your hands to slide down your legs as your roll down, tucking your chin to your chest, or bring your hands to the ground and press your fingertips downward as you roll down, keeping the back of your head on the floor.
Variation: Release the posture by supporting your hips with your hands and relaxing your pelvis as you lower one leg at a time into the bridge pose.

HEAD TO KNEE (Journey into the Self)
____________________
Janu Shirshasana
From a sitting position with your legs extended, bring the sole of one foot to the inside of the other thigh. (To relieve tension in lower back and help lengthen the spine, you may use a cushion under your sitz bones.)
1. Press your sitz bones downward.
2. Press the crown of your head away from your shoulders.
3. Extend your fingertips overhead and press them away from your shoulders.
4. Pressing your bent knee downward, allow your torso to turn to face your extended leg.
5. Expand your chest by pressing out through your chest points.
6. Press the heel of your extended leg away from your hip.
7. Lift your tailbone and allow the lifting to extend your torso out over your extended leg.
8. Extend your arms out along the leg and relax into the stretch. Allow your head and neck to follow the curve of your spine. (If your torso is able to rest on the extended leg, press the crown of your head away from your shoulders.)
Release, allowing your torso to return to an upright position, and repeat on the opposite side.
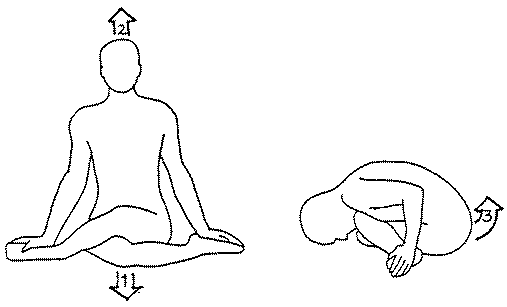
HERO
____________________
Virasana
From a seated position, cross one knee over to the other, bringing each foot to the outside of the opposite hip. Place your palms on the soles of your feet.
1. Press your sitz bones downward.
2. Press the crown of your head away from your shoulders and allow the pressing to lengthen your spine.
3. Lift your tailbone, allowing your torso to extend out over your knees.
Allow your head and neck to relax into a comfortable position.
Release, and repeat with the opposite knee on top.
Variations:
Place the palms of your hands on the floor in front of you.
For tight hips, place a cushion beneath your sitz bones.
To increase the stretch, draw your feet out farther away from your body.
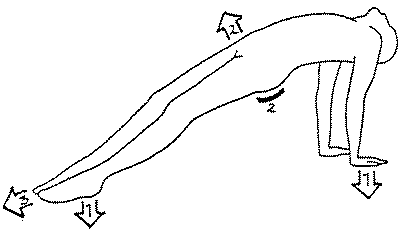
INCLINED PLANE
____________________
Purvottanasana
From a seated position, extend your legs and place the palms of your hands on the ground a few inches behind your hips. Lean onto your hands.
1. Press the palms of your hands and your heels downward.
2. Bring up the squeeze and press your pubic bone upward, allowing the pressing to lift your hips off the ground. (It is easier physically if the pubic bone rises above the line between your feet and the crown of your head.)
3. Press out through the tips of your toes.
Either tuck your chin toward your chest or lift your chin, lowering your head behind you.
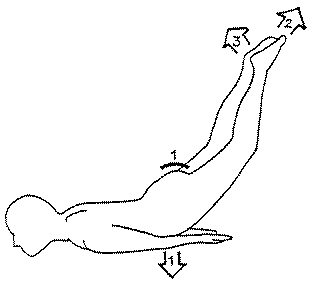
LOCUST
____________________
Shalabhasana
Lie on your belly with your chin on the ground. Extend your arms by your sides or under your thighs with your hipbones resting on your forearms. Choose whichever of the following hand positions suits your body:
-palms down
-fists with palm side down
-fists with back side down
-fists with thumb side down
-fingers interlaced
-any variation of your own
1. Bring up the squeeze, pressing your hipbones downward as you draw your forearms close together and press them downward. Allow the momentum of the pressing to lift both legs.
Advanced Variation: Press your forearms downward and catapult your legs off the ground.
2. Press the tips of your toes away from your hips and allow the pressing to elongate your legs.
3. Press the tops of your heels upward and feel your legs rising in response to the pressing.
MOON SALUTATION
____________________
Chandra Namaskar
1. PRANAMS: Stand in Tadasana. Press feet, squeeze, crown. Press palms together at elbow level.
2. HALF MOON: Circle fingertips overhead, interlacing fingers and pointing index fingers upward in "temple" position. Press left foot and left hip, extending torso to right. Press right foot and right hip, extending torso through center to left. Press left foot, returning to center.
3. VICTORY SQUAT: Step to the right and point toes slightly outward. Soften knees and press sitz bones and elbows downward, fingertips upward.
4. FIVE-POINTED STAR: Press feet (straightening legs), squeeze, crown, and fingertips, extending arms at shoulder level.
5. TRIANGLE: Turn right toes to right, left heel to left, and press left hip, extending torso to right. Lower right hand as you raise left hand, pressing fingertips.
6. RUNNER'S STRETCH: Lower both hands toward right foot, resting hands on leg, foot, or floor. Press feet, tailbone, crown.
7. LUNGE: Bend forward knee, bringing hands to floor on either side of leading foot and back knee to floor. Press forward foot, palms, sitz bones, crown.
8. EXTENDED-LEG SQUAT: Bring both hands to the left of the leading foot and press sitz bones downward as you pivot to face center, rotating extended leg so that toes point upward. Press hands, foot of bent leg, heel of extended leg, sitz bones, crown.
9. SQUAT: Bring extended leg toward center. Press feet, sitz bones, crown. If flexibility allows, bring palms together at elbow level.
10. EXTENDED LEG SQUAT: With hands once again on the floor, extend right leg to the side. Press hands, foot of bent leg, heel of extended leg, sitz bones, crown.
11. LUNGE: Pivot to face bent knee, with hands on either side of leading foot, rotating back leg and bringing back knee to floor. Press forward foot, palms, sitz bones, crown.
12. RUNNER'S STRETCH: Lift hips by pressing feet, tailbone, crown.
13. TRIANGLE: Sweep right arm upward and back, sliding left hand up left leg. Press feet, squeeze, left hipbone, crown, fingertips.
14. F1VE POINTED STAR: Bring both arms to shoulder level, turning toes slightly outward. Press feet, squeeze, crown, fingertips.
15. VICTORY SQUAT: Soften knees, press sitz bones, elbows downward, fingertips upward.
16. HALF MOON: Press feet (straightening legs) and turn toes to face forward. Step right foot close to left foot as you bring arms overhead into "temple" position. Press feet, squeeze, crown, fingertips. Press right foot and right hip, extending torso to left. Press left foot and left hip, extending torso through center to right. Press right foot, returning to center.
17. PRANAMS: Press teet, squeeze, crown. Circle arms back to center, pressing palms together at elbow level.

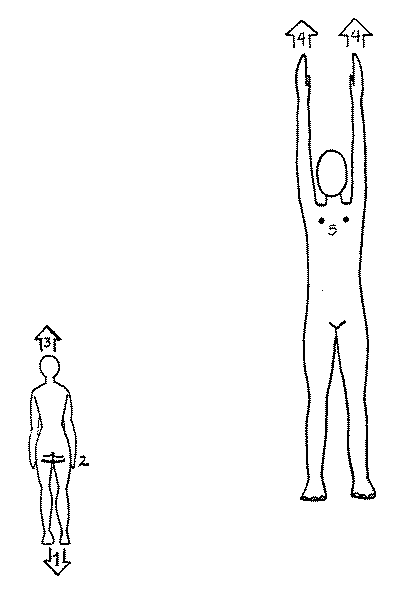
MOUNTAIN
____________________
Tadasana
1. Standing with your feet parallel and hip width apart, shift your weight toward the balls of your feet and press the soles of your feet downward.
2. Bring up the squeeze.
3. Press the crown of your head away from your shoulders and allow the pressing to elongate your spine.
4. Allow your fingertips to rise overhead, turning your palms to face each other, and press your fingertips away from your shoulders.
5. Expand your chest by pressing out through your chest points.
PIGEON 1 & 2
____________________
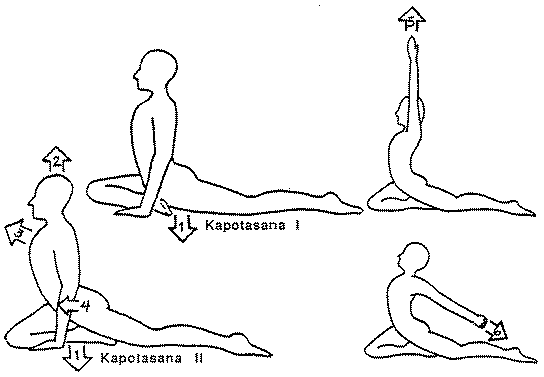
Kapotasana I & II
From a position sitting on your heels, slide your left leg behind you.
1. Kapotasana I: Shift your weight to the right, bringing your buttocks to the floor, and press your sitz bones downward.
Kapotasana II: Sit on your right heel and press your right shin downward.
2. Press the crown of your head away from your shoulders.
3. Expand your chest by pressing out through your chest points.
4. Press the hipbone of the extended leg forward.
5. Variation 1. Allow your fingertips to rise overhead and turn your palms to face each other. Press your fingertips away from your shoulders and allow the pressing to elongate your arms.
6. Variation 2. Bring your hands behind your back, interlacing your fingers and, if possible, drawing the heels of your palms together. Press your hands away from your shoulders, allowing your arms to elongate, your shoulder blades to come together, and your chest to expand.
Release, and repeat on the opposite side.
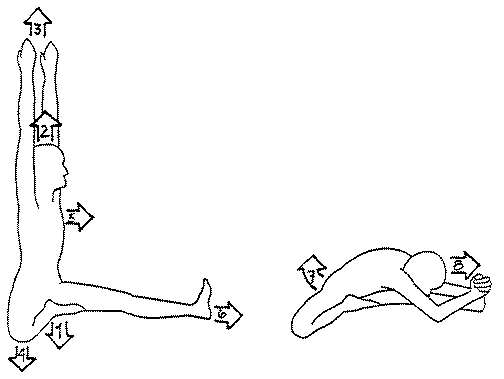
POSTERIOR STRETCH
____________________
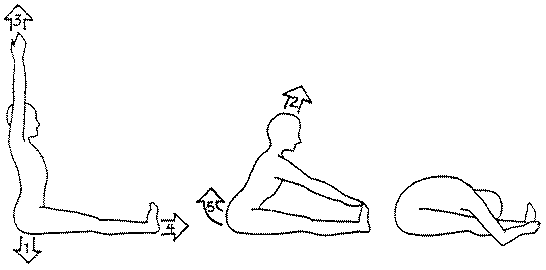
Pashchimottanasana
From a sitting position, extend both legs. (If you are unable to sit up straight, place a cushion under your sitz bones.)
1. Press your sitz bones downward.
2. Press the crown of your head away from your shoulders.
3. Extend your fingertips overhead and press them upward away from your shoulders.
4. If you have good flexibility in your legs, press your heels away from your hips; otherwise, just relax your legs.
5. Lift your tailbone and allow the lifting to extend your torso over your outstretched legs.
Bring your hands to your feet or legs and relax into the stretch.
To release, press your tailbone downward and allow your spine to come back to the starting position.
Special Note: If you feel too much tension in your back, place one or more cushions in your lap and allow your chest to rest on the cushions.
SEATED ANGLE
____________________
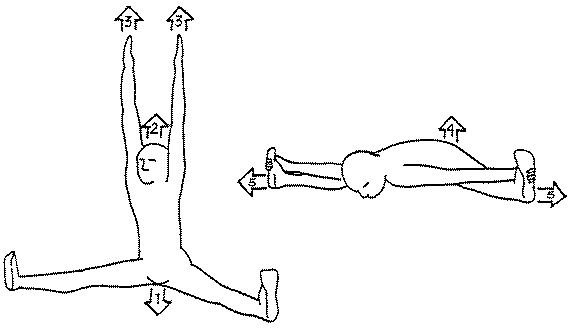
Upavistha Konasana
From a seated position with your legs extended, spread your legs wide apart.
-
Press your sitz bones downward.
-
Press the crown of your head away from your shoulders and feel the elongation in your spine.
-
Allow your fingertips to rise overhead, turning your palms to face each other, and press your fingertips away from your shoulders.
-
Lift your tailbone and allow the lifting to extend your torso forward and down.
-
If flexibility allows, press your heels away from your hips.
SPINAL TWIST
____________________
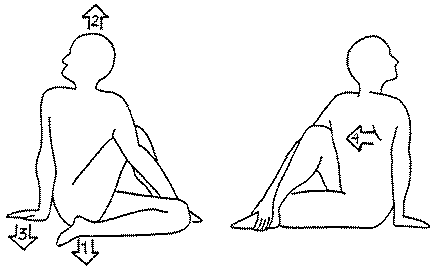
Matsyendrasana
From a seated position with your legs extended, draw your right foot up close to your body with your knee pointing upward. Cross your right foot over your left leg, placing the sole on the ground near the knee.
Bend your extended leg, drawing your foot in close to the opposite hip. (If sitting in this position creates strain or if both buttocks do not touch the ground, leave the leg extended.)
-
Press your sitz bones downward.
-
Press the crown of your head away from your shoulders and feel the elongation of your spine.
Variation 1. Extend your left arm to the side and bring it to the front, bending your elbow around your right knee.
Variation 2. Bring your left arm to the outside of your right knee and hold your right foot or your left knee.
Variation 3. Bring your left arm to the outside of your right knee, and, bending your elbow, thread your hand through the space between your two legs. Bring your other arm behind you and clasp your hands. -
Bring your right palm to the ground behind you and press it downward. (Not in Variation 3.)
-
Press your right wing point back, allowing your torso to rotate in response to the pressing.
Release, and repeat on the opposite side.
STANDING HAND TO FOOT
____________________
Padahastasana
-
Standing with your feet parallel and hip width apart, shift your weight toward the balls of your feet and press the soles of your feet downward.
-
Bring up the squeeze.
-
Press the crown of your head away from your shoulders and allow the pressing to elongate your spine.
-
Allow your fingertips to rise overhead, turning your palms to face each other, and press your fingertips away from your shoulders.
-
Lift your tailbone and allow the lifting to extend your torso forward. Release the squeeze gradually as your torso continues downward.
To release the posture, press the soles of your feet downward and drop your tailbone, gradually bringing up the squeeze as you return to the starting position.
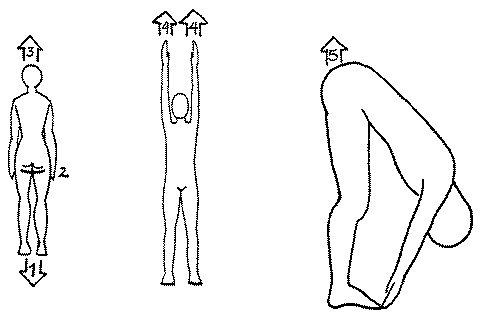
STANDING SQUAT
____________________
Utkatasana
-
Standing with your feet parallel and hip width apart, shift your weight toward the balls of your feet and press the soles of your feet downward.
-
Bring up the squeeze.
-
Press the crown of your head away from your shoulders and allow the pressing to elongate your spine.
-
Allow your fingertips to rise in front of you to shoulder level and press your fingertips away from your shoulders.
-
Allow your knees to soften, pressing your sitz bones downward toward your heels as if you were about to sit in a chair. (Keep your spine upright.)
To release the posture, press the soles of your feet downward and allow your legs to straighten, releasing your arms as you return to the starting position.
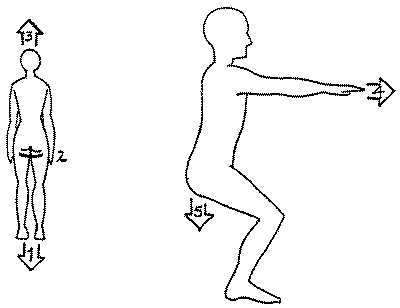
STANDING YOGA MUDRA
____________________
-
Standing with your feet parallel and hip width apart, shift your weight toward the balls of your feet and press the soles of your feet downward.
-
Bring up the squeeze.
-
Press the crown of your head away from your shoulders and allow the pressing to elongate your spine.
-
Bring your hands behind your back, interlacing your fingers and, if possible, drawing the heels of your palms together. Press your hands away from your shoulders, allowing your arms to elongate, your shoulder blades to come together, and your chest to expand.
-
Lift your tailbone and allow the lifting to extend your torso forward. Release the squeeze gradually as your torso continues downward.
-
Allow your arms to come over your head and press your little fingers toward the floor in front of your.
To release the posture, press the soles of your feet downward and drop your tailbone, gradually bringing up the squeeze as you return to the starting position.
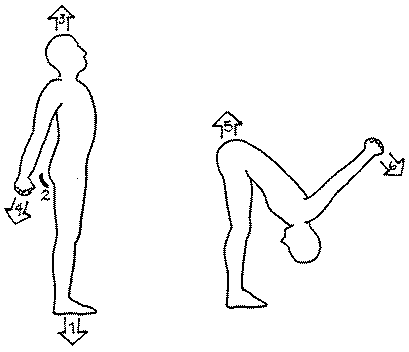
STRAIGHT-LEGGED RUNNER'S STRETCH
____________________
Parshvottanasana
Standing with your feet wide apart, turn the toes of one foot out to that side and the heel of your other foot out to the other side.
-
Press the soles of your feet downward.
-
Bring up the squeeze.
-
Press the crown of your head away from your shoulders and allow the pressing to elongate your spine.
-
Turn your entire body to face your leading foot and press your back hipbone forward.
Bring your hands behind your back and either hold your elbows, forearms, or wrists or bring your palms into prayer position with your fingertips pointing upward. -
Lift your tailbone and allow the lifting to extend your torso forward. Release the squeeze gradually as your torso continues downward.
To release the posture, press the soles of your feet downward and drop your tailbone, gradually bringing up the squeeze as you return to an upright position. Release your arms and turn your body and feet to face forward in the starting position.
Repeat on the opposite side.
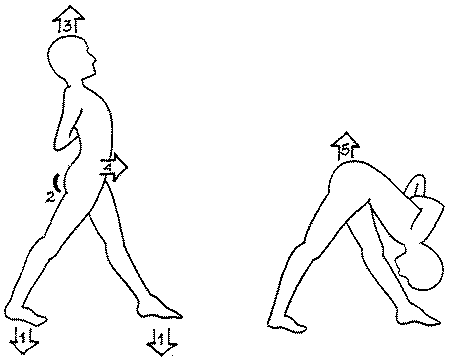
SUN SALUTATION
____________________
Surya Namaskar
-
Standing with your feet parallel and hip width apart, bring your palms together in front of your chest and Shift your weight toward the balls of your feet. Press feet, squeeze, crown.
-
Allow your fingertips to rise overhead. Press feet, squeeze, pubic bone, chest points, crown, fingertips.
-
Lift your tailbone and allow your torso to extend forward. Release the squeeze gradually as your torso continues downward. Bring your palms or fingertips to the floor next to your feet. Press feet, palms or fingertips, tailbone.
-
Bending your left leg, draw your right toot back into a lunge. Press front foot, heel of back foot, squeeze, crown.
-
Bring your front foot back next to the back foot. Press palms, heels, squeeze, crown.
-
Bend your knees and lower knees, chest, and chin to the ground. Press palms, tailbone.
-
Sweep your chest and chin forward and up. Press palms, feet, squeeze, chest points, crown.
-
Lift your tailbone, allowing your hips to rise. Press feet, palms, tailbone, chest points, crown.
-
Bending your right leg, bring your right foot forward into a lunge. Press sole of front foot, heel of back foot, squeeze, crown.
-
Press sole of right foot (straightening legs) as you bring your back foot forward. Press feet, palms or fingertips, tailbone.
-
Drop your tailbone and gradually bring up the squeeze as you return to standing and allow your fingertips to rise overhead. Press feet, squeeze, pubic bone, chest points, crown, fingertips.
-
Press feet, squeeze, crown as you allow your body to return to the starting position with your palms together in front of your chest.
SYMBOL OF YOGA
____________________
Yoga Mudra
-
From a position sitting on your heels, press your sitz bones downward.
-
Press the crown of your head away from your shoulders and feel the elongation of your spine.
-
Bring your hands behind your back, interlacing your fingers and, if possible, drawing the heels of your palms together. Press your hands away from your shoulders, allowing your arms to elongate, your shoulder blades to come together, and your chest to expand.
-
Lift your tailbone and allow the lifting to extend your torso forward over your knees, bringing your forehead to rest on the ground.
-
Allow your arms to come over your head, pressing your little fingers toward the floor in front of you.
To release, press your shins downward and drop your tailbone as you return to the starting position.
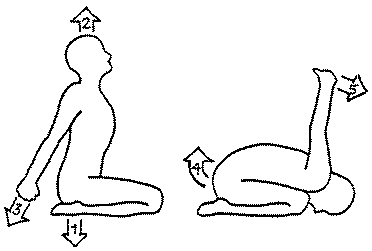
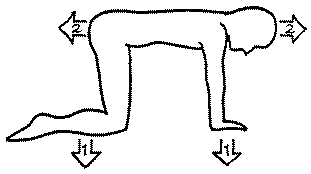
From a kneeling position, place your palms on the ground directly beneath your shoulders and your knees directly beneath your hips.
-
Press your weight into the palms of your hands and into your shins.
-
Press your tailbone back away from your hips as you press the crown of your head away from your shoulders and feel the elongation of your spine.
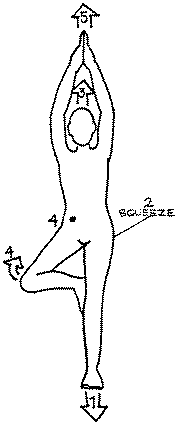
TREE
____________________
Vrikshasana
Standing with your feet parallel and hip width apart, shift your weight toward the balls of your feet and press the soles of your feet downward.
Shift your weight to one foot, lifting the other foot off the ground and bringing your hara over the supporting foot. Focus your gaze at a point at eye level in front of you.
Bring the sole of the lifted foot to the inner calf or thigh of the supporting leg.
Advanced Variation: Cross the lifted leg in front of the supporting leg near your hip joint, holding it with your hand until your balance is stabilized.
-
Press the sole of your supporting foot downward.
-
Bring up the squeeze.
-
Press the crown of your head away from your shoulders and feel the elongation of your spine.
-
Press the back side of your lifted knee back as you press the hipbone on the same side forward.
-
Allow your fingertips to rise overhead and interlace your fingers with your index fingers pointing upward. Press your fingertips away from your shoulders.
Release, and repeat on the opposite side.
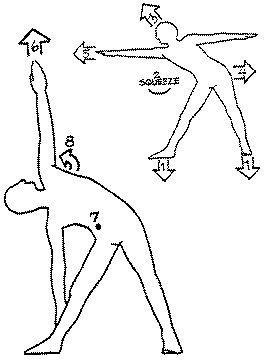
TRIANGLE
____________________
Trikonasana
Standing with your feet wide apart (about the length of one of your legs), turn the toes of your right foor out to the right and the heel of your left foot out to the left.
-
Press the soles of your feet downward.
-
Bring up the squeeze, pressing your right hipbone forward, and feel your pelvis coming into alignment facing front.
-
Press the crown of your head away from your shoulders and allow the pressing to elongate your spine. Let your fingertips rise out to your sides to shoulder level.
-
Press your left hip to the left and allow the pressing to extend your torso to the right. (To avoid hyperextension of the right knee, align the kneecap directly above your toes or keep the knee slightly bent.)
-
Press out through the fingertips of your right hand.
-
Maintaining the extension of your torso, lower your right hand to your right leg as you raise your left hand overhead, pressing your fingertips away from your shoulders.
-
Press your right hipbone slightly forward, allowing your left hipbone to roll back.
-
Press your upper wing point back and allow the pressing to rotate your chest upward, bringing your torso into alignment.
Rotate your head on the axis of your spine to gaze up toward your raised hand.
To release, press the soles of your feet downward as you press your raised fingertips upward and return to the starting position. Repeat the posture on the opposite side.
UPWARD DOG
____________________
Urdhva Mukha Shvanasana
From a belly-down position, place your palms down close to your sides and even with your chest. Flex your toes under.
-
Bring up the squeeze.
-
Press the balls of your feet downward as you press the palms of your hands away from your shoulders and allow the pressing to lift your torso off the ground.
-
Press the crown of your head away from your shoulders and feel the elongation of your spine.
-
Press your heels away from your hips and allow the pressing to elongate the backs of your legs.
-
Expand your chest by pressing out through your chest points.
Release the pressure on your palms and gradually release the squeeze as your body returns to the starting position.

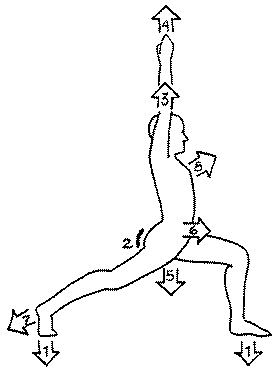
WARRIOR I
____________________
Virabhadrasana I
Standing with your feet wide apart (about the length of one of your legs), turn the toes of one foot to that side and the heel of the other foot to the other side.
-
Press the soles of your feet downward.
-
Bring up the squeeze.
-
Press the crown of your head away from your shoulders and allow the pressing to elongate your spine.
-
Turn your torso to face the leading leg. Raise your arms overhead and press your fingertips away from your shoulders.
-
Bend your leading knee and sink into the posture, allowing your sitz bones to become heavy and your tailbone to relax. (To avoid knee strain, align your leading knee directly above your toes.)
-
Press your back hipbone forward.
-
Press your back heel downward and feel the elongation in the back of your leg.
-
Expand your chest by pressing out through your chest points.
Release the posture by returning to the starting position, and repeat on the opposite side.
Variation: Standing in Tadasana, raise your arms overhead and take a large step forward, bending your leading knee and sinking into the posture.
WARRIOR II
____________________
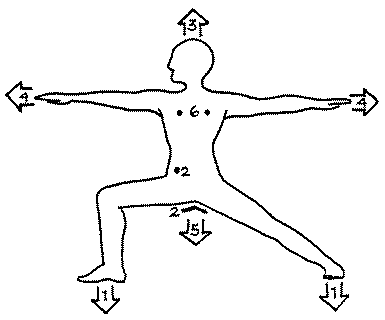
Virabhadrasana II
Standing with your feet wide apart (about the length of one of your legs), turn the toes of one foot out to that side and the heel of the other foot to the other side.
- Press the soles of your feet downward.
- Bring up the squeeze, pressing your leading hip bone forward, and feel your pelvis coming into alignment facing front.
- Press the crown of your head away from your shoulders and allow the pressing to elongate your spine.
- Extend your fingertips out to your sides at shoulder level and press them away from your shoulders.
- Bend your leading knee and sink into the posture, allowing your sitz bones to become heavy and your tailbone to relax. (To avoid knee strain, align your leading knee directly above your toes.)
- Expand your chest by pressing out through your chest points.
Turn your head to gaze toward the fingertips of your leading hand.
Release the posture by returning to the starting position, and repeat on the opposite side.
This page last updated: 02/27/2018
